




Create a sale invoice
A sale invoice (tax invoice) is the bill you give your customer. Billing Saathi calculates GST for every line, reduces your stock and keeps track of what the customer has paid.
Where to find it: Sale Invoice ▾ → Create Sale Invoice, or + Create → Sale Invoice (keyboard Alt + Shift + I)
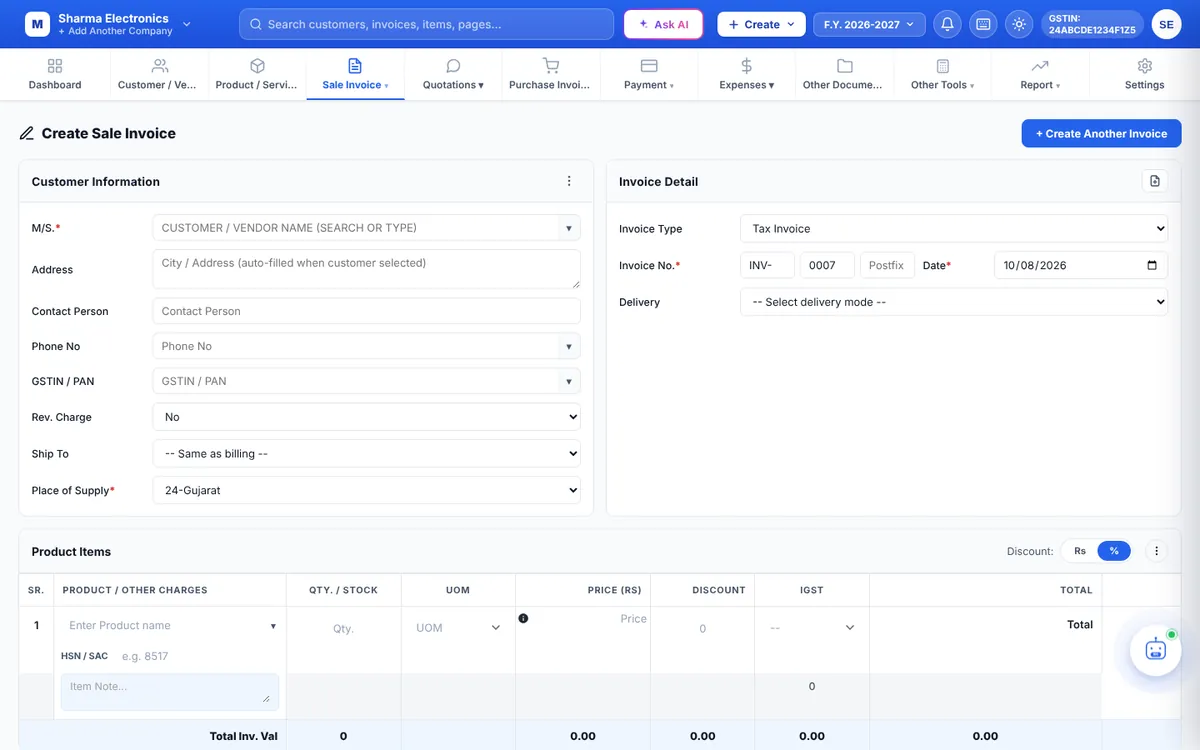
1. Customer Information
- M/S. (required): type the customer’s name and pick it from the list, or click ▾ to see all customers. You can also find a customer by typing their Phone No or GSTIN / PAN in those boxes. For a walk-in or new customer, just type the name.
- Address, Contact Person, Phone No, GSTIN / PAN fill in automatically for saved customers. You can change them for this bill.
- Rev. Charge: choose Yes only if the buyer pays the tax under reverse charge.
- Ship To: keep Same as billing, or choose Different address and type the delivery address.
- Place of Supply (required): the state where the goods or services are supplied. It decides whether CGST + SGST or IGST applies. How GST works
2. Invoice Detail
- Invoice Type: Tax Invoice, Bill of Supply, Reverse Charge Invoice, Export Invoice, SEZ with Payment or SEZ without Payment. Invoice types explained
- Invoice No.: filled in automatically as Prefix + Number + Postfix (for example INV- 0007). You can change it; a number that is already used is refused. Change numbering
- Date: the invoice date (today by default).
- Delivery: choose how the goods travel to show the transport fields. Delivery and transport details
3. Product Items
- Click Enter Product name and pick a product. The HSN/SAC, unit, price and GST rate fill in, and the available stock shows under the quantity box.
- Change the Qty., Price or Discount if needed. Add an Item Note (yellow box) if you want to print extra details under the product name.
- For IMEI/serial or batch products, choose the serial number or batch shown under the product name.
- Click the green + at the end of the row to add another line, or the red − to remove one.
More options (discounts in Rs or %, additional charges, notes) are explained in Items, discounts and additional charges.
4. Other details
- Due Date: when payment is due (used for overdue tracking and reminders).
- Bank: choose which bank account to print, or hide bank details on this bill.
- Terms & Condition / Additional Note: printed at the bottom. Click + Add Notes for more.
- Document Note / Remarks: your own notes — not printed.
5. Amount Detail and payment
Check the taxable value, tax, discount, round off and Grand Total (with the total in words). Then choose the Payment Type: CREDIT if the customer pays later, or CASH, CHEQUE or ONLINE if they pay now. Record payment while creating an invoice
6. Save
- Save & Print saves the bill and opens it for printing.
- Save saves it and keeps you on the page.
- Discard clears the form; ← Back leaves without saving.
- + Create Another Invoice (top right) starts a fresh bill.
Before saving you can tick Show digital stamp & signature on invoice, and under Smart Suggestion choose to Share on Email or Create Delivery Challan straight after saving.
What happens when you save
- Stock goes down for each product.
- A new customer is saved to your customer list, and a typed-in new product is added to your products.
- Any amount received is recorded as an Inward Payment automatically.
- Unpaid amounts appear in Sale Outstanding.